Wednesday, March 11, 2020

Shrimp Cucumber Bites

You know the saying time flashes before your eyes...it's absolutely true.  As I was trying to figure out what to cook and blog this week, I saw this one in my que...from July...of LAST summer!


Well, as they also say...better late than never.

So, as I was saying, our friends made these last summer for a 4th of July party they hosted (hence the red platter).  These little beauties are so, so, so good!  Refreshing and light, but pack a flavorful bite.  Not only are these perfect during our no meat Fridays for entertaining, but I will definitely make these for upcoming Cinco de Mayo.

Shrimp Cucumber Bites
Courtesy of Delish.com

1/3 c. extra-virgin olive oil
1/4 cup lime juice
2 Tbl honey
2 cloves garlic, minced
1 tsp Cajun seasoning
Kosher salt
1 lb. shrimp, peeled and deveined, tails discarded
2 large cucumbers, peeled and sliced about 1/4 to 1/2 inch thick

Guacamole (feel free to use your own favorite recipe or store purchased version)

In a large bowl, combine oil, lime juice, honey, garlic, and Cajun seasoning.  Season with salt.  Add shrimp and toss until fully coated, then cover and refrigerate for 30 minutes or up to an hour.

In a large skillet over medium heat, cook shrimp until pink and completely opaque, about 2 minutes per side.  Remove from heat.

Place a tablespoon sized dollop of guacamole on each cucumber slice.  Top with shrimp and garnish with cilantro (optional).

One Year Ago: Chicken, Artichoke, and Cannellini Bean Spezzatino
Two Years Ago: Eating My Words...Part 1 and Cheesy Country Ham Dip
Three Years Ago: Julie & Julia's Tomato Bruschetta
Four Years Ago: Portillo's Chopped Salad...Possibilities of Spring
Five Years Ago: Breakfast Casserole and Breaking The Rules
Six Years Ago: Chile-Cheese Egg Bake


Saturday, March 7, 2020

Jordan Marsh's Blueberry Muffins

If there is anything I love more than the scent of fresh brewed coffee in the mornings when I wake up, it is the scent of freshly baked blueberry muffins!


At my firm, I am responsible for catering the kitchen every week.  Each Monday morning before I arrive, I go to the organic market and pick up every fresh fruit, vegetable, organic cheeses and crackers, and every other type of healthy snack you can imagine for our office to enjoy through the week.

Sometimes there are extras at the end of the week and we divide up goodies, based on whoever wants to take something home.  Lucky me, I scored the fresh blueberries this week.  Even luckier for me, my husband got up before I did and made these amazing blueberry muffins...from scratch!

Enjoy your weekend!


Jordan Marsh's Blueberry Muffins
Courtesy of New York Times Cooking

1/2 cup softened butter
1-1/4 cups sugar
2 eggs
1 tsp vanilla extract
2 cups flour
1/2 tsp salt
2 tsp baking powder
1/2 cup milk
2 cups blueberries, washed, drained, and picked over
3 tsp turbinado sugar (Sugar In The Raw)

Preheat oven to 375 degrees.

Cream the butter and 1-1/4 cups sugar until light.

Add the eggs, one at a time, beating well after each addition.  Add vanilla.

Sift together the flour, salt, and baking powder, and add to the creamed mixture alternately with the milk.

Crush 1/2 cup blueberries with a fork, and mix into the batter.  Fold in the remaining whole blueberries.

Line a 12 cup standard muffin tin with cupcake liners, and fill with batter.  Sprinkle the 3 teaspoons of turbinado sugar over the tops of the muffins, and bake at 375 degrees for about 30-35 minutes.

One Year Ago: "Man"estrone Soup
Two Years Ago: Eating My Words...Part 1...Cheesy Country Ham Dip

Three Years Ago: Lemon Chess Pie
Four Years Ago: BBQ Glazed Meatloaf
Five Years Ago: 24 Hour Salad
Six Years Ago: Tapenade Pasta Salad

Wednesday, March 4, 2020

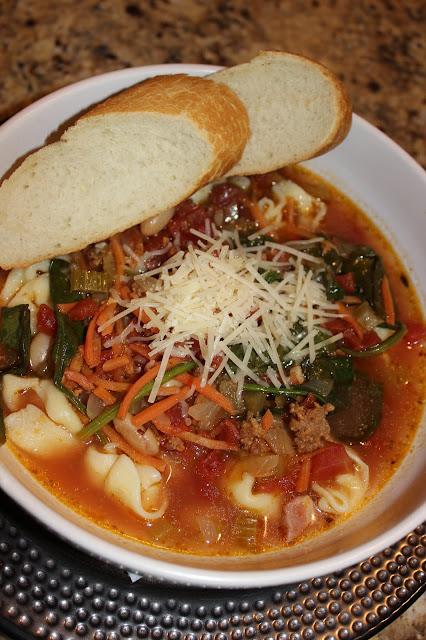
Winter Minestrone


Our spring/summer/winter...back to spring weather continues to tease relentlessly.  I just want to go outside and sit on our deck in the sun...for more than 3 minutes.

Until then, I have been on a decorating mission as of late...a bit of a pre-spring cleaning and reviving accessories, if you will.  As I still stick to my motto..."never pay full price for fabulous", I have been nailing it at the local vintage and resale stores.  So many wonderful finds each weekend... just enough to keep me busy (and in trouble).

We are also very early in our Lenten season, so I am forever looking for meat free recipes.  Although this version of our new favorite Winter Minestrone is not meat free, I have also made it without the pancetta and Italian sausage, and it is equally as wonderful.


Winter Minestrone
Adapted from Barefoot Contessa

olive oil
pancetta, 1/2 inch diced
1 pound Italian sausage
1-1/2 cup chopped yellow onions
2 cups (1/2 inch) diced carrots (3 carrots)
2 cups  (1/2 inch) diced celery (3 stalks)
1-1/2 Tbl minced garlic (4 cloves)
2 tsp chopped fresh thyme leaves
26 ounces canned or boxed chopped tomatoes
6 to 8 cups chicken stock
1 bay leaf
salt and feshly ground black pepper
1 (15 ounce) can cannellini beans, drained and rinsed
8 to 10 ounces fresh baby spinach leaves
 1/2 cup dry white wine
2 Tbl store bough pesto
1 (12 ounce) bag frozen cheese tortellini
freshly grated Parmesan cheese, for serving

Heat 2 tablespoons of olive oil over medium heat in a large, heavy pot or dutch oven.  Add the pancetta and cook over medium-low heat for 6 to 8 minutes, stirring occasionally, until lightly browned.  Add the ground Italian sausage and continue until fully cooked through.  Remove the cooked pancetta and Italian sausage with a slotted spoon, put into a bowl and set aside.

To the same heavy pot, add the onions, carrots, celery, garlic, and thyme and cook over medium heat, stirring occassionally , for 8 to 10 minutes, until the vegetables begin to soften.

Add the tomatoes, 6 cups of the chicken stock, the bay leaf, the cooked pancetta and Italian sausage, 1 tablespoon salt, and 1-1/2 teaspoons pepper to the pot.  Bring to a boil, then lower the heat and simmer uncovered for 30 minutes to one hour.

While the soup is simmering, cook the frozen tortellini according to package directions.  When they are fully cooked, drain and set aside.

Discard the bay leaf, add the beans and heat through.  The soup should be quite thick but if it's too thick, add more chicken stock.  Just before serving, reheat the soup, add the spinach and stir well.  Cook just until the leaves are wilted.  Stir in the white wine and pesto.

In large shallow serving bowls, add a ladle of the cooked tortellini.  Add the minestrone soup over the tortellini.  Sprinkle with Parmesan cheese, drizzle with olive oil, and serve hot.

Three Years Ago: Nicoise Salad
Four Years Ago: Prosciutto-Wrapped Chicken
Five Years Ago: Spicy Asian Beef
Six Years Ago: Priceless


Saturday, February 29, 2020

Taking A Leap Of Faith and Shoebox Heroes


A little over ten years ago, I visited my first rescue mission in Southern California.  I was overwhelmed with emotion after my tour seeing all the families there for various reasons, some of them for reasons that were completely out of their control.


The next weekend I went back to donate some food to their kitchen pantry for the upcoming week.  A mother and her children arrived at the front door and asked the desk receptionist if they had received any shoe donations that day yet.

I looked down and saw that the children's shoes were too small and they were needing to wear socks (it was 95 degrees that day).  My heart sank right there in the lobby.


My inner voice was calling me to do something...Shoebox Heroes was born.

Since then we were able to raise and receive thousands of pairs of shoes for children in that area.

Now that I have moved to Northern Colorado, my children are now starting their own lives and that inner voice was calling out to me again...time to make a difference and help children and families.

On 02/20/2020, I launched our new website Shoebox Heroes!  Please take the time to reach out and share our site to your friends, family, neighbors, co-workers, and anyone else you think would love to "Be Someone's Shoebox Hero".  You can also follow and stay in touch with us on Facebook and Twitter!

"Big journeys begin with small steps...our journey has just begun."


Wednesday, February 26, 2020

Baked Orange Roughy for Ash Wednesday


Happy Ash Wednesday and the beginning of Lenten season!  So it begins, some sacrifices, goals, and spiritual soul searching.  What will you be giving up (or dedicated to doing) for the next 40 days?


Tonight is the first of "no meat" meals, so I'm sure some type of seafood or fish will be served up at home this evening.  I tried this Orange Roughy out a few weeks ago.  Oh my goodness was this wonderful!  In my (50+) years, I have never had this type of fish.  I have been missing out on such great meals.  I was surprised that it was not "fishy" tasting at all, more of a sweet like crab flavor...and I am loving this recipe for preparing it.

Baked Orange Roughy
Adapted from Epicurious.com

4 orange roughy fillets
4 Tbl olive oil
garlic powder to taste
4 Tbl butter
paprika to taste
capers
salt and pepper to taste
1 Tbl freshly chopped parsley

Preheat oven to 350 degrees.

Rinse fillets in water, pat dry with paper towels, and set aside.

Melt butter in a small saucepan.  Add garlic powder and olive oil.

Spray a glass baking dish with non-stick cooking spray.

Sprinkle both sides of fish with salt and pepper.  Lay fish fillets in the dish.

Pour garlic-oil butter mixture over the fillets.

Sprinkle with paprika, capers, and parsley.

Bake approximately 25 minutes until fish is flaky.  

Three Years Ago: King Cake Bubble Up
Five Years Ago: Chicken and Dumplings
Six Years Ago: Original Peanut Coleslaw


Saturday, February 22, 2020

Cajun Dirty Rice Casserole


Fat Tuesday / Mardi Gras is upon us next week.  What plans do you have for celebrating?  We have yet another storm brewing up, so more than likely we will be holed up cozy at home.

I took this casserole for a test run a few weeks ago and so glad I did.  I'll be serving this one up for sure!  Super easy and awesome taste.  Also made for great work lunch leftovers (if you have any) Enjoy!


Cajun Dirty Rice Casserole
Courtesy of PlainChicken.com

1 (8 ounce) box Zatarain's Dirty Rice
1 lb. smoked sausage, chopped
2 cups chopped cooked chicken
1 (10.75 ounce) can Cream of Chicken Soup, undiluted
1 cup sour cream
1 cups shredded Parmesan cheese
1 (2.8 ounce) can french fried onions

Preheat oven to 350 degrees.  Spray a 9x13 inch baking dish with cooking spray.

In a large skillet, cook smoked sausage until starting to brown.  Add dirty rice mix and water called for on the package.  Prepare dirty rice according to package directions.

Remove dirty rice and sausage from heat.  Stir in cooked chicken, cream of chicken soup, sour cream, and Parmesan cheese.

Spread rice mixture into prepared baking dish.  Top casserole with french fried onions.

Bake uncovered for 30 minutes, until bubbly.

One Year Ago: Almond-Crusted Halibut with Lemon Garlic Butter
Two Years Ago: Creamy Penne Pesto Chicken
Three Years Ago: King Cake Bubble Up
Four Years Ago: One Pot Chili Mac and Cheese
Five Years Ago: Purple Potion #49
Six Years Ago: Lasagna Soup


Wednesday, February 19, 2020

Birthdays...Sunrise, South Africa, and Surf Crab Cakes

Today was my birthday and I woke up to the most glorious sunrise in our neighborhood.  Unfortunately it took a turn for the worst and one of our famous blizzards came setting in.  It took me 2 hours to drive home from work.  I thanked God that I even made it home okay because there was some serious accidents along the way.


When I made it home, we enjoyed a beautiful bottle of Barista's Pinotage from South Africa.  I stumbled on this wine during a trip to a local store who was featuring this pairing with chocolates and cheeses.  I took one sip and was hooked!  I can't even try to explain how smooth and incredible this red wine is...like nothing I have every tried before.


We then headed into the storm to have date night dinner at Loveland Chop House.  I was going to order crab cakes for an appetizer, but since we had just enjoyed them at home for our Valentine's date night home, I opted for their Two Bite Shrimp and Risotto...amazing!


Crab Cakes with Red Pepper Sauce
Adapted from Allrecipes.com

Crab Cakes:
1/4 cup mayonnaise
1/4 cup fresh chives
2 Tbl minced fresh parsley
1 Tbl lemon juice
1/2 tsp seafood seasoning
1/8 tsp cayenne pepper
freshly ground black pepper
1 pound lump crab meat, cartilage removed
2-1/2 cups Panko bread crumbs

Red Pepper Sauce:
1/2 cup chopped sweet red pepper
1/4 chopped green onions
1/4 cup Dijon mustard
1/4 cup mayonnaise
2 Tbl minced shallots
2 Tbl minced fresh parsley
1 Tbl honey
1 Tbl lemon juice
salt and pepper to taste

T tbl butter
1 Tbl olive oil
Lemon wedges

In a large bowl, combine the first seven ingredients; stir in crab. Add 1 cup of the Panko breadcrumbs to the crab mixture; mix well.

Shape 1/4 cupfuls of crab mixture into patties.  Coat both sides of patties with remaining Panko crumbs, pressing to adhere.  Place on baking sheet; cover and refrigerate for up to 6 hours.

For sauce, in a blender of food processor, combine the red pepper, onions, mustard, mayonnaise, shallots, parsley, honey, lemon juice, salt, and pepper;  cover and process until finely chopped.  Refrigerate until serving.

In a large skillet, melt half of butter and half of oil.  Place half of the crab cakes in skillet.  Cook over medium heat for 5 minutes on each side or until lightly browned (carefully turn the delicate cakes over).  Repeat with remaining butter, oil, and crab cakes.  Serve with red pepper sauce and lemon wedges.

One Year Ago: Almond-Crusted Halibut with Lemon Garlic Butter
Two Years Ago: Creamy Penne Pesto Chicken
Three Years Ago: Champagne Margaritas
Four Years Ago: The Birthday Flirtini
Five Years Ago: Purple Potion #49
Six Years Ago: Lasagna Soup

My newfound obsession (and birthday gift this year), is Glassybaby votives.  I am so in love with these, and thanks to my husband and daughters, they have started me on my collection.  Check out their website, and if you are in the Seattle area, you must see their store...you will be an instant fan too!


Saturday, February 15, 2020

Baked Mac and Cheese and Cabin Fever


Cabin fever is setting in and it's starting to get a little uncomfortable.  These little teasers of 70 degrees one weekend and waking up to a foot of snow and 10 degrees is becoming exhausting.


My husband is convinced he's never going to see a golf course again this year.  Trust me, I am praying that green grass shows up sooner than later! There is only so much remodeling construction at our home, in one weekend that any of us can handle right now.


He has rigged up his own hitting net in our garage that is on a pulley system and can be stored up to the ceiling or down, for his daily practice shots.  It is actually a very clever system and I'm really impressed how he did a DIY practice range in our 3rd car area.   It's however, a miracle my car has not taken a ball yet!


Since our garage is quite chilly this time of year, he has a personal propane heater that I got him for his birthday.  It's amazing how warm these little babies get.


He also did a DIY of this (I actually have no idea what this contraption is).  It looks important.  He took a lot of time in making it and he uses for practicing in the garage.  I only know that I keep tripping on it, while trying to get to/from my car.


My husband is ready to go with whatever the weather brings....on the left, his "clicgear" golf bag buggy, and on the right...the ever necessary snow shovel.

Let me also just state for the record that I did not hang that mirror up for me to check myself out before I leave for work in the morning.  That is my husband's mirror which we scored at Goodwill for $2 !!.  He was told to hang it in the practice area, so he can see his swing form.  


While he continues to practice his golf, I continue to practice new recipes.  This one came to me from my youngest daughter.  She has made it three times at our house now, and it just gets better and better.  She takes half the pan back to her school, and leaves the other half for me and husband to enjoy during the week.  It truly is one of the BEST homemade versions we've enjoyed.

The BEST Homemade Baked Mac and Cheese
Courtesy of Mom On Timeout

16 ounces Cellentani pasta (or elbow macaroni), cooked
1 Tbl extra virgin olive oil
6 Tbl unsalted butter
1/3 cup all purpose flour
3 cups whole milk
1 cup heavy whipping cream
4 cups sharp cheddar cheese, shredded
2 cups Gruyere cheese, shredded
salt
pepper
1-1/2 cups panko crumbs
4 Tbl butter, melted
1/2 cup Parmesan cheese, shredded
1/2 tsp smoked (or regular) paprika

Preheat oven to 350 degrees.  Lightly grease a large 3qt or 4 qt baking dish and set aside.  Combine shredded cheeses in a large bowl and set aside.

Cook the pasta one minute shy of al dente according to the package instructions.  Remove from heat, drain, and place in a large bowl.

Drizzle pasta with olive oil and stir to coat pasta.  Set aside to cool while preparing cheese sauce.

In a medium bowl, combine the sharp cheddar and Gruyere cheeses together.  Set aside.

Melt butter in a deep saucepan, dutch oven, or stock pot.

Whisk in flour over medium heat and continue whisking for about 1 minutes until bubbly and golden.  

Gradually whisk in the milk and heavy cream until nice and smooth.  Continue whisking until you see bubbles on the surface and then continue cooking and whisking for another 2 minutes.  Whisk in salt and pepper.

Add two cups of shredded cheese and whisk until smooth.  Add another two cups of shredded cheese and continue whisking until creamy and smooth.  Sauce should be nice and thick at this point.

Stir in the cooled pasta until combined and pasta is fully coated with the cheese sauce.

Pour half of the mac and cheese into the prepared baking dish.  Top with remaining 2 cups of shredded cheese and then the remaining mac and cheese.

In a small bowl, combine panko crumbs, Parmesan cheese, melted butter and paprika.  Sprinkle over the top and bake until bubbly and golden brown, about 30 minutes.  Serve immediately.

One Year Ago: Good-Bye Sweet Angus
Three Years Ago: Champagne Margaritas
Four Years Ago: Birthday Flirtini
Five Years Ago: Raspberry-Lemon Dump Cake
Six Years Ago: Chocolate Layered Pudding


Wednesday, February 12, 2020

Mushroom Marsala Cream Sauce and Sunsets


Just when I think I cannot take another day of cold and/or snow.  I walk outside and see the most breathtaking sunsets and suddenly it's all worth it.


My husband and I were running errands a couple weeks ago and pulled into a parking lot.  I opened my door and was mesmerized.  Mother Nature sure knows how to paint a beautiful picture, wouldn't you agree?!


If you are still looking for something special to make this Valentines for stay-at-home date night.  This sauce is amazing!!!  So easy to pull together on a week night but tastes like you worked on it all day.  It is so silky, it works on steaks, chicken, and pork tenderloin.

Wishing you a special Valentine's Day and many beautiful sunsets!


Mushroom Marsala Cream Sauce
Courtesy of No Spoon Necessary

2 Tbl unsalted butter
1 small shallot, finely diced
8 ounces cremini mushrooms, baby bella, or white button mushrooms, (or combination) thinly sliced
2 cloves garlic, minced
1-1/2 Tbl all purpose flour 
1-1/4 cup dry Marsala cooking wine
1/3 cup beef stock
3 Tbl heavy cream
1-1/2 tsp fresh thyme, chopped
1-1/2 tsp fresh parsley, chopped
salt
ground black pepper

Melt butter in a saute pan over medium heat.

Add in the shallot and season with a pinch of salt and pepper.  Saute 1-2 minutes, or until softened.

Add the mushrooms to pan.  Saute until liquid is evaporated and mushrooms are barely cooked through, about 3 minutes.

Add in the garlic and a scant 1/4 tsp salt.  Saute until fragrant, about 30 seconds.

Sprinkle the flour over mushrooms and stir to incorporate.

Reduce heat to medium/medium-low and add in the Marsala wine.  Cook until slightly reduced, about 4-6 minutes, scraping up browned bits off bottom of pan.

Add in the beef stock and continue to cook until slightly reduced again, about 4-5 minutes.  

Stir in the heavy cream and thyme.  Reduce heat to maintain a gentle simmer.   Simmer for 3-4 minutes, stirring occasionally.

Add in the parsley.  taste and adjust for seasoning with salt and pepper.

Serve over over steak, chicken, pork, or pasta.  Enjoy!

Three Years Ago: Champagne Margaritas
Four Years Ago: Birthday Flirtini
Five Years Ago: Raspberry-Lemon Dump Cake
Six Years Ago: Chocolate Layered Pudding


Saturday, February 8, 2020

Homemade Cinnamon Rolls


Nothing says "I love you", more than special homemade gifts.  You can't put a price tag on the time, care and attention to making something from scratch for someone.

My daughter "Baby B" and I tried our hand at homemade cinnamon rolls for the first time this year at our family Christmas breakfast.  I don't know why I have been intimidated all these years.  My sister-in-law, Jodi also always made them for her family every Christmas morning and she had it down to a science.

I'm sorry to say "Mr. Dough Boy", you and I may never meet again.  These cinnamon rolls are positively amazing!  Give yourself some time and planning...it is definitely worth the effort.

Be sure to make up a batch of these beauties for your loved ones next week on Valentine's Day.


My daughters gave me a new kitchen gift for Christmas this year.  They have started a tradition of giving me "humorous" pot holders every year...these (comedian) girls crack themselves up, they think they are quite funny!

Homemade Cinnamon Rolls
Courtesy of Delish

Dough:
1/2 cup unsalted butter, melted
2 cups whole milk, warm to the touch
1/2 cup granulated sugar
2-1/4 tsp active dry yeast
5 cups flour, divided
1 tsp baking powder
2 tsp salt

Filling:
3/4 cup butter, softened
3/4 cup light brown sugar
2 Tbl ground cinnamon

Frosting:
4 ounces cream cheese, softened
2 Tbl butter, melted
2 Tbl whole milk
1 tsp vanilla extract
1 cup powder sugar

Generously butter two disposable foil pie/cake pans.

In a large bowl, whisk together warm milk, melted butter, and granulated sugar.  The mixture should be just warm, registering between 100-110 degrees.  If it is hotter, allow to cool slightly.

Sprinkle the yeast evenly over the warm mixture and let set for 1 minute.

Add 4 cups of all-purpose flour to the milk mixture and mix with a wooden spoon until just combined.

Cover the bowl with a towel or plastic wrap and set in a warm place to rise for 1 hour.

After 1 hour, the dough should have nearly doubled in size.

Remove the towel and add an additional 3/4 cup of flour, the baking powder, and salt.  Stir well, then turn out onto a well-floured surface.

Knead the dough lightly, adding additional flour as necessary, until the dough just loses its stickiness and does not stick to the surface.


Roll the dough out into a large rectangle, about 1/2 inch thick.  Fix corners to make sure they are sharp and even.


Spread softened butter evenly over the dough.

Sprinkle evenly with brown sugar and a generous sprinkling of cinnamon.


Press the mixture into the butter.


Roll up the dough, forming a log, and pinch the seam closed.  Place seam-side down.  Trim off any unevenness on either end.


Cut the log in half, then divide each half into 7 evenly sized pieces.  About 1-1/2 inches thick each.


Place 7 cinnamon rolls in each cake pan, one in the center, six around the sides.  Cover with plastic wrap and place in a warm place to rise for 30 minutes.


Preheat oven to 350 degrees.

Remove plastic wrap.  Bake the cinnamon rolls in a preheated oven for 25-30 minutes, until golden brown.


While cinnamon rolls are baking, make the frosting.

In a medium-size bowl, whisk together cream cheese, butter, whole milk, vanilla, and powder sugar, until smooth.


While the cinnamon rolls are still warm, drizzle evenly with frosting.

Enjoy all that sweet, homemade loving goodness!

Three Years Ago: I'm Back and One Year Older
Five Years Ago: Cross My Heart Danish
Six Years Ago: Hotel Chocolate Cupcakes